> ## Documentation Index
> Fetch the complete documentation index at: https://docs.oxen.ai/llms.txt
> Use this file to discover all available pages before exploring further.
# 🎥 Video Generation
> How to fine-tune a video generation model in Oxen.ai
Oxen.ai allows you to fine-tune a video generation model to generate higher quality videos with consistent brand assets, characters, products, or your own style with no infrastructure setup required. Fine-tune your models with a few clicks, deploy your model to an endpoint, and own all your weights to download and use anywhere.
You can train on either still images or short video clips. Images are enough to capture a *look*, training on video clips lets the model learn **motion**, and with models that support audio (like LTX-2.3 Pro) the fine-tune can even learn how a character **sounds**.
*2 second video of the office manager says, "What's happening, Greg."*
## Example: Generating Videos of a Character
In this example, we are going to fine-tune a video model to generate videos of a specific character. The same steps work for any video model on Oxen. Here we use **LTX-2.3 Pro**. We'll use the manager from *Office Space* (great movie, go watch it if you haven't), and we'll see if we can teach the model his voice, posture and cadence.
At the start of the training run the model doesn't know who the "office manager" is, by the end it nails his face, voice, speaking style and signature lean over the cubicle.
*2 second video of the office manager says, "What's happening, Greg." Left: step 1, no concept of the character. Right: step 2000, spot on.*
## Creating the Training Dataset
Every fine-tune starts with a dataset, the media you want the model to produce (images or video clips), each paired with a caption. During training the model ties the caption's words to what it sees, so your captions pull double duty, they're the training signal now, and the template for how you'll prompt later. The takeaway is to caption each clip the way you'd prompt for it. At inference you can prompt freely in that same style, no need to match a caption word for word.
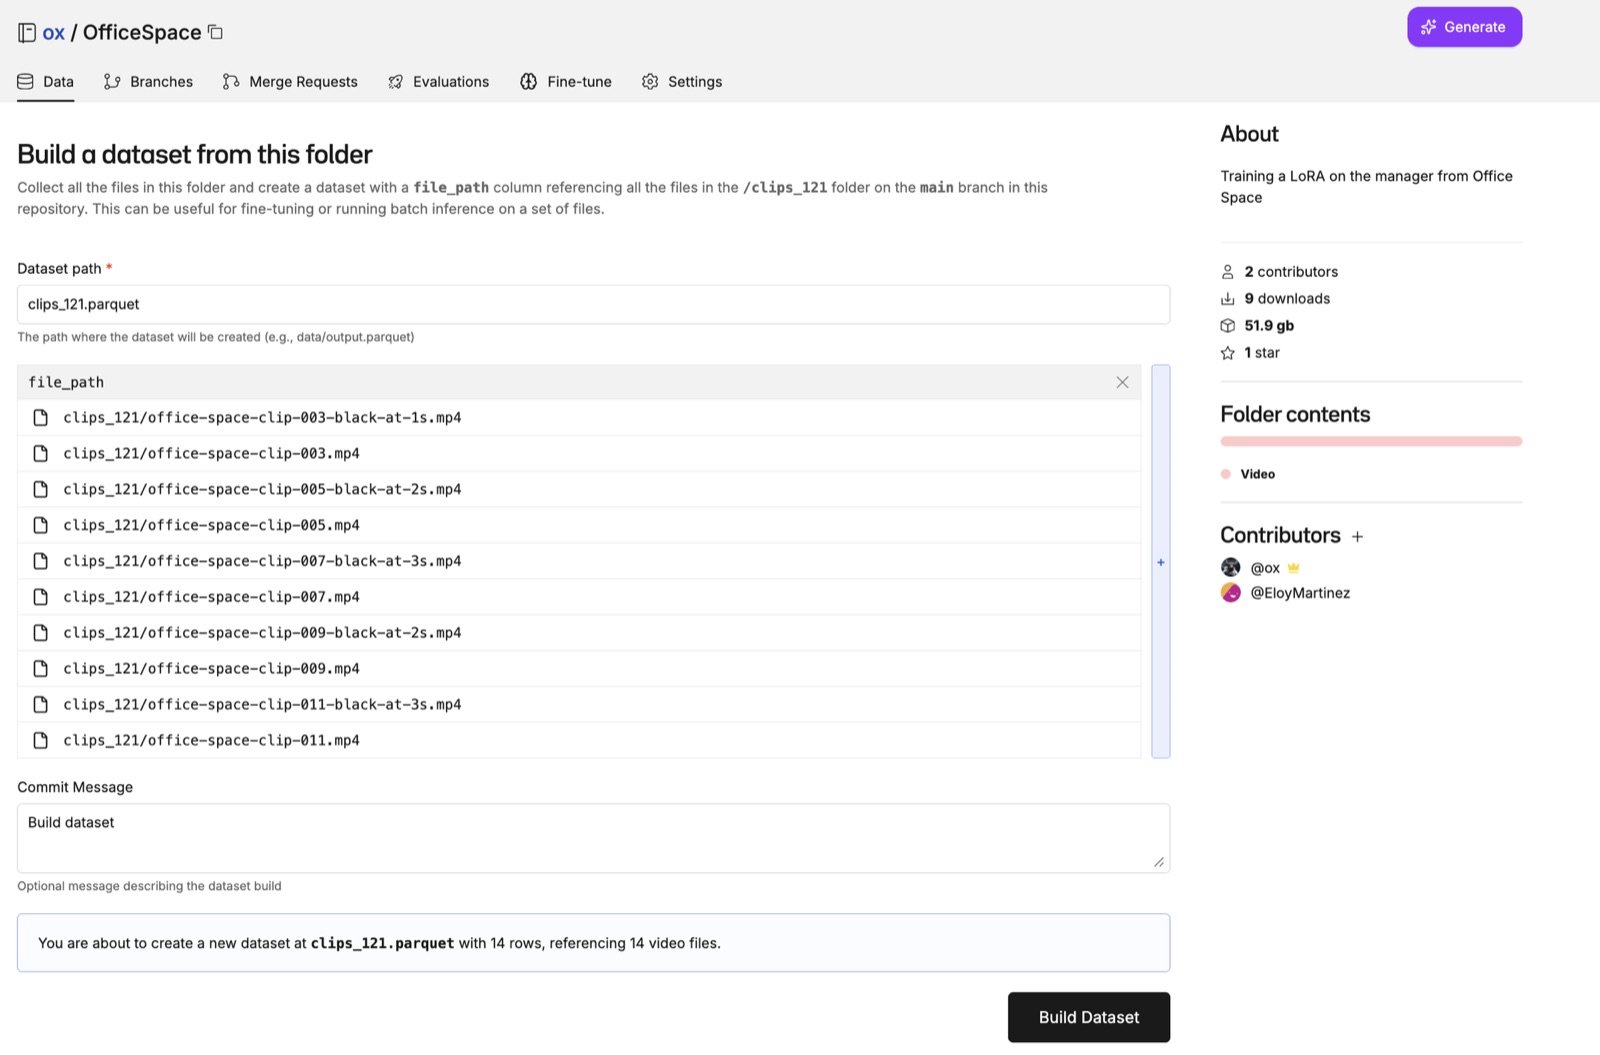
The expected format is a `csv`, `jsonl`, or `parquet` file with a column that contains the *relative path* to each image or video clip in the repository, and a column that contains its description.
In this example, we have two columns.
1. `file_path` - the relative path to the image or video clip in the Oxen repository
2. `caption` - the description of the media, used as the prompt once the model is deployed
**Why the clips fade to black.** LTX-2.3 always works in fixed five-second chunks (**121 frames**), both when training and when generating. The manager's line, though, is only about two seconds long. If we train on a full five seconds, the model learns to stretch that short line to fill the whole clip, and his quick, deadpan delivery comes out slow and dragged. So after he stops talking we replace the rest of the frames with **solid black** and add `duration two seconds` to the caption. Now the model learns to deliver the line in two seconds and then go black, and you get that same tight pacing when you generate by prompting with the same `duration`. We used Claude Code and FFmpeg to cut and pad the clips.
In order to get started, create a repository, then click the "Add Files" button. You can drag and drop a zip file of your media, which is automatically unzipped into your repository. Write a commit message before uploading so your team knows why you added these files. This is handy when iterating on training datasets.
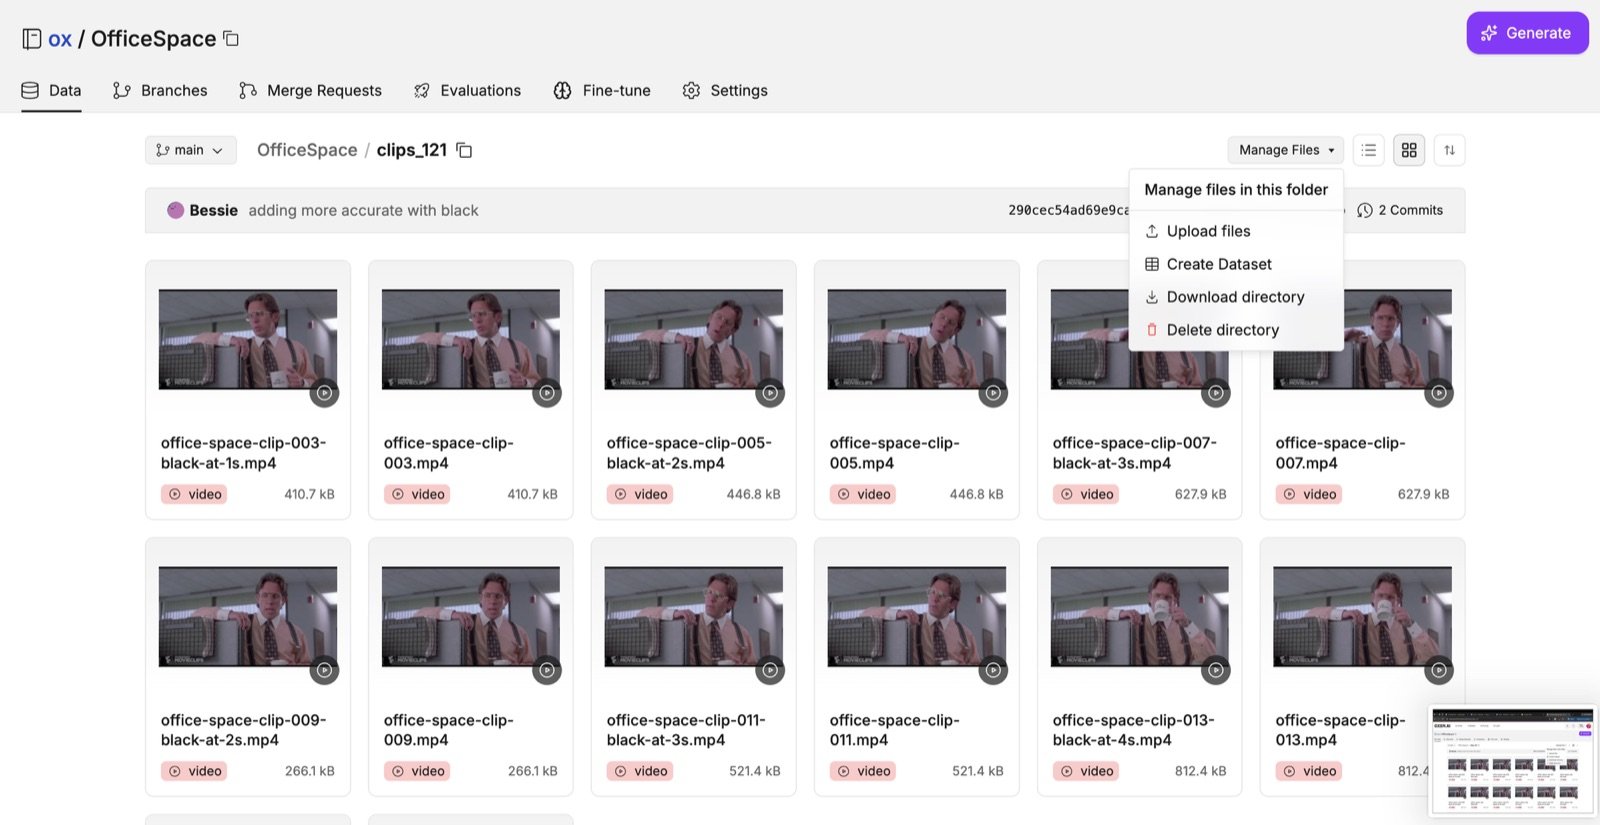
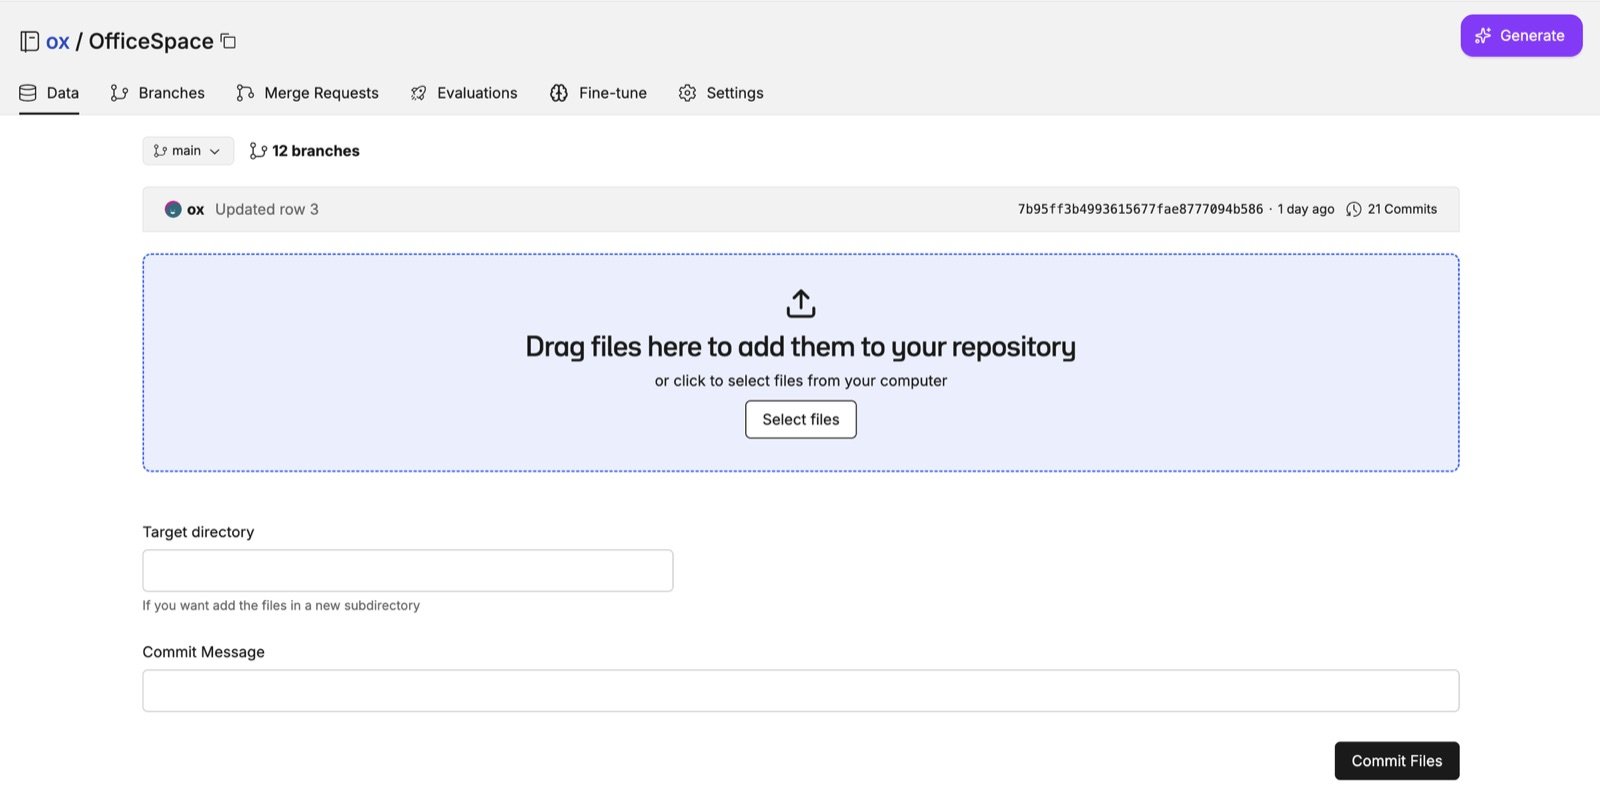 Once your media has been uploaded, navigate into the folder, click **Manage Files**, and choose **Create Dataset**.
 On the "Build a dataset from this folder" screen, Oxen collects every file into a parquet with a `file_path` column. Give it a name (for example `clips_121.parquet`) and click **Build Dataset**.
 To preview your media, enable rendering on the `file_path` column. Click the "✏️" edit button above the dataset, then edit the column to turn on image or video rendering.
## Auto-Captioning the Dataset
Now that we have a dataset, we need a description for each item. You can caption from the dataset viewer ("Actions" → "Run Inference") or in the fine-tune wizard's **Label Data** step. Select a model that can go from `image -> text` (or `video -> text` for clips), such as **Gemini 3 Flash**, write your prompt, and click **Caption All**.
```text theme={null} theme={null}
You are helping caption videos for a fine-tuning dataset. Describe the video in one sentence or less. Respond with only the caption text, nothing else.
{file_path}
```
You must supply the curly braces around the `{file_path}` column in the prompt so the model knows which column to use for the media.
To preview your media, enable rendering on the `file_path` column. Click the "✏️" edit button above the dataset, then edit the column to turn on image or video rendering.
## Auto-Captioning the Dataset
Now that we have a dataset, we need a description for each item. You can caption from the dataset viewer ("Actions" → "Run Inference") or in the fine-tune wizard's **Label Data** step. Select a model that can go from `image -> text` (or `video -> text` for clips), such as **Gemini 3 Flash**, write your prompt, and click **Caption All**.
```text theme={null} theme={null}
You are helping caption videos for a fine-tuning dataset. Describe the video in one sentence or less. Respond with only the caption text, nothing else.
{file_path}
```
You must supply the curly braces around the `{file_path}` column in the prompt so the model knows which column to use for the media.
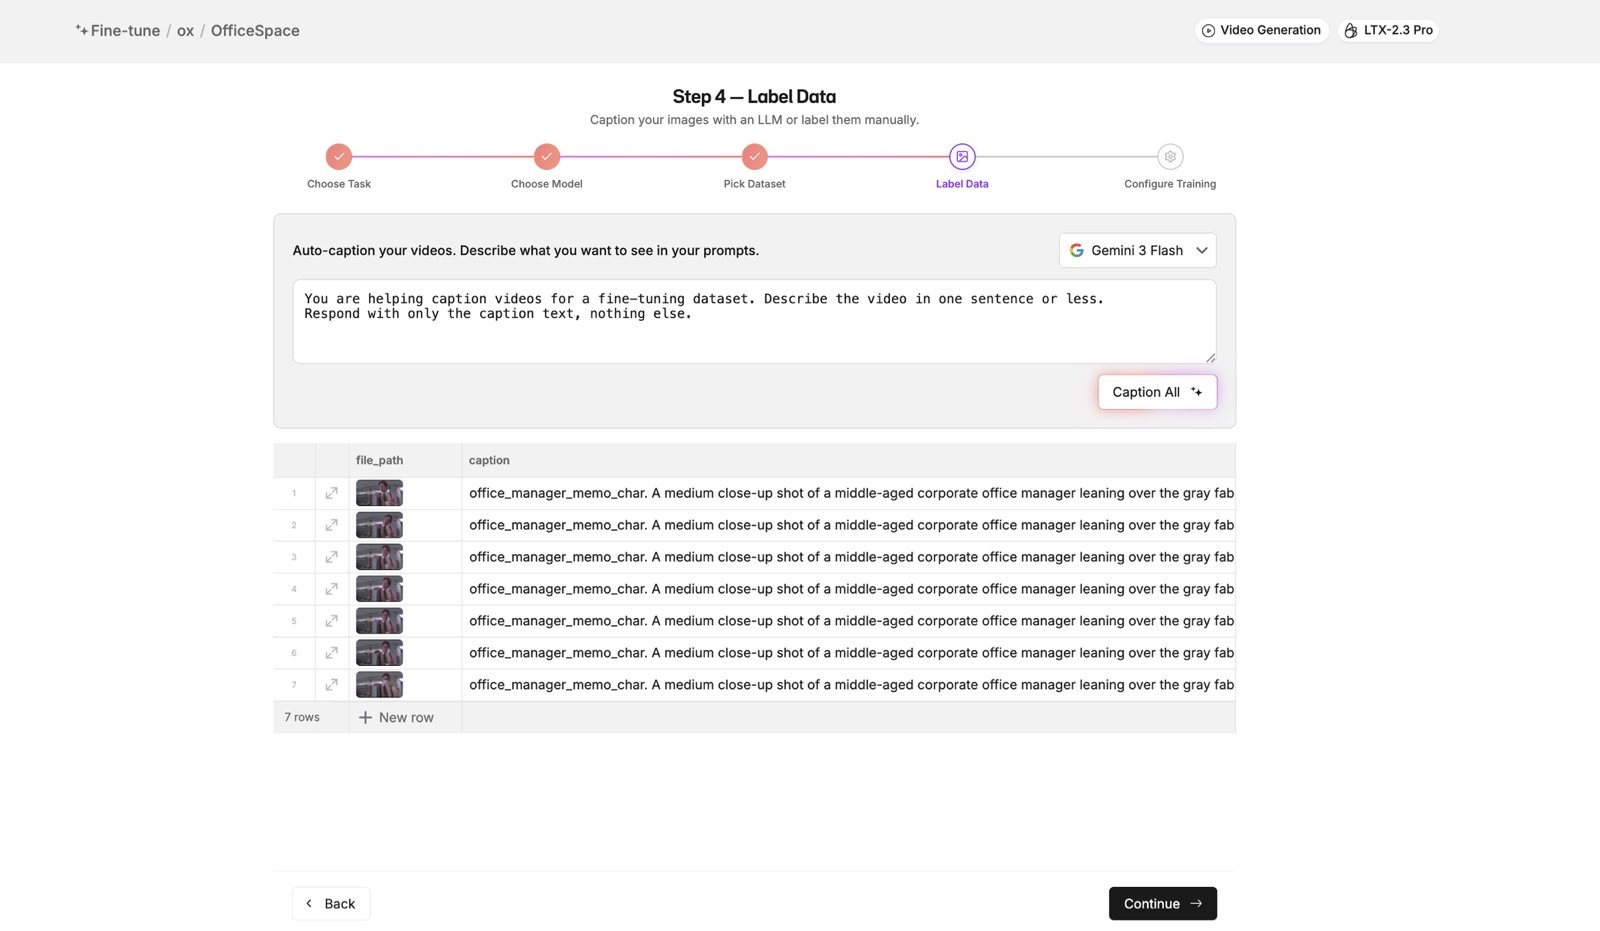 Keep captions consistent with your goal. For a **character**, prefix every caption with a unique trigger token (for example `office_manager_memo_char`) so the model binds the subject to that token. For a **style**, describe the look rather than naming a character the base model already knows, so it generalizes to new subjects. If you're training on clips, add a `duration two seconds` note so the model learns when to cut to black.
If you want to further refine your prompts, you can always click the "✏️" edit button on the dataset viewer and hand label the captions. Every change is version controlled, so you can always roll back to an earlier version of the dataset.
## Kicking off the Fine-Tune
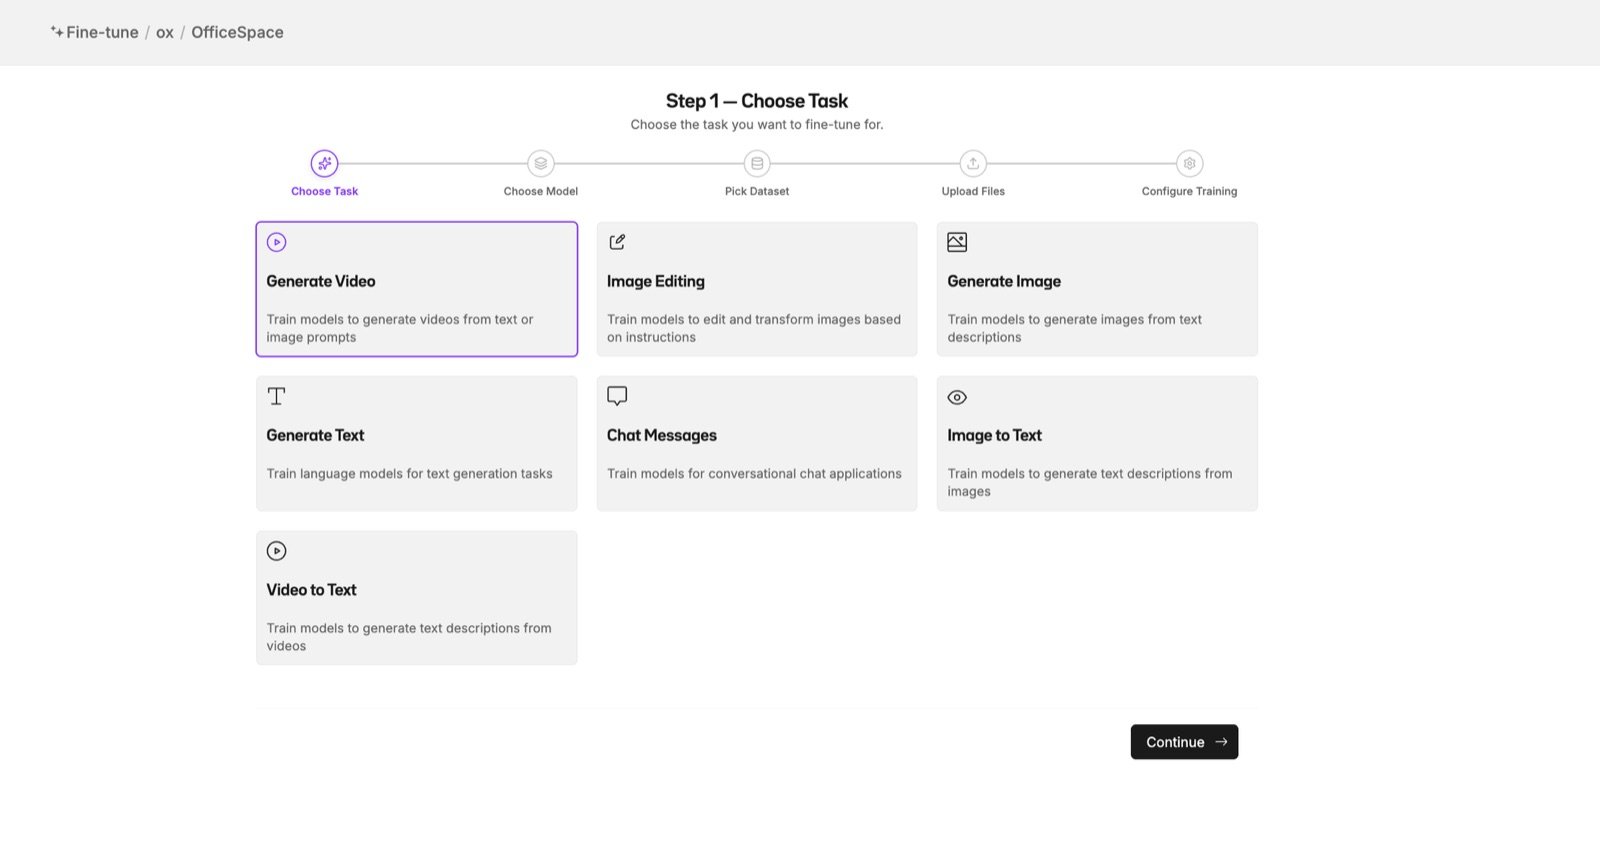
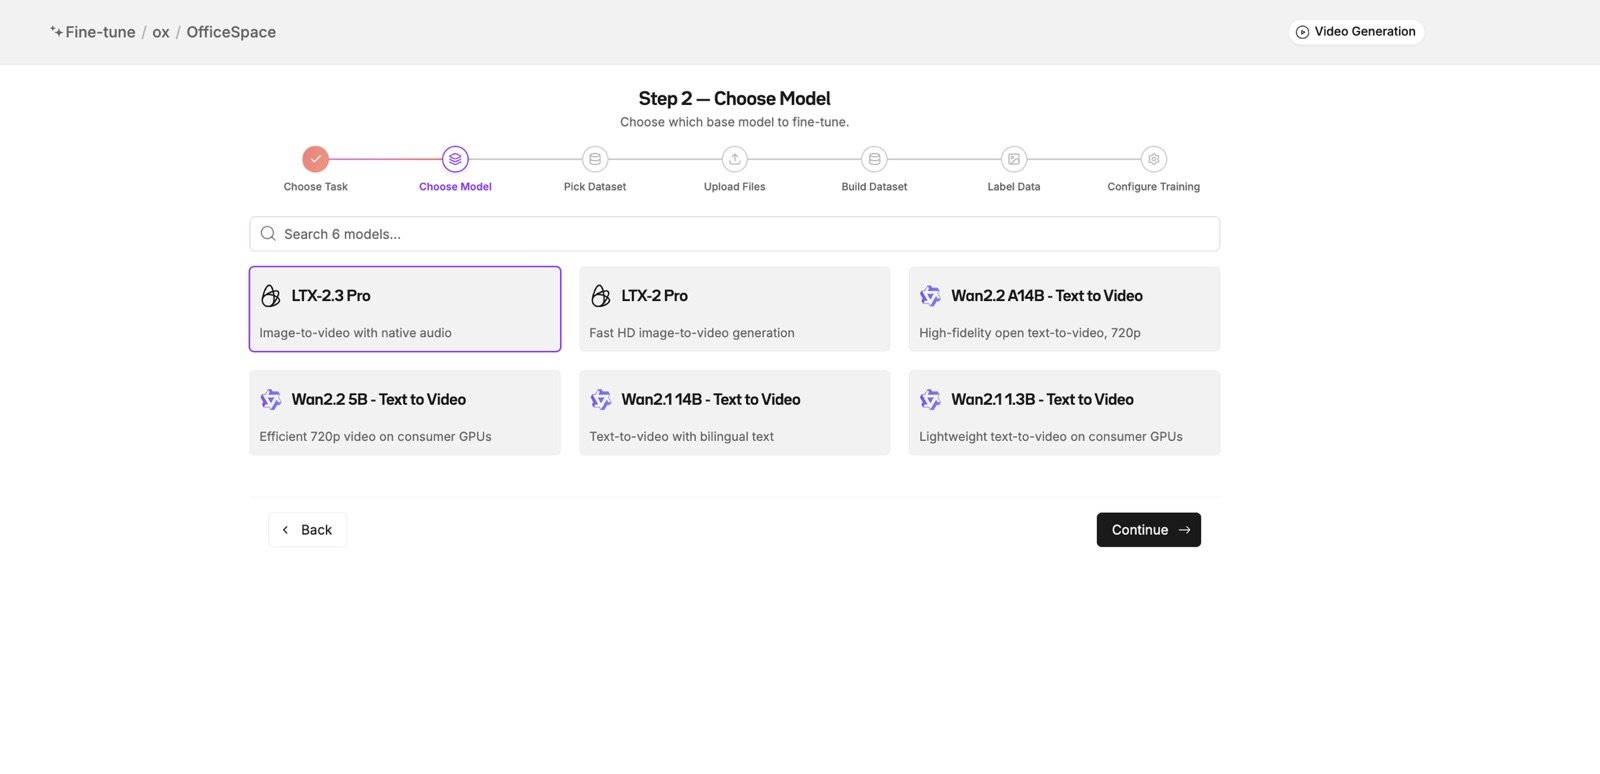
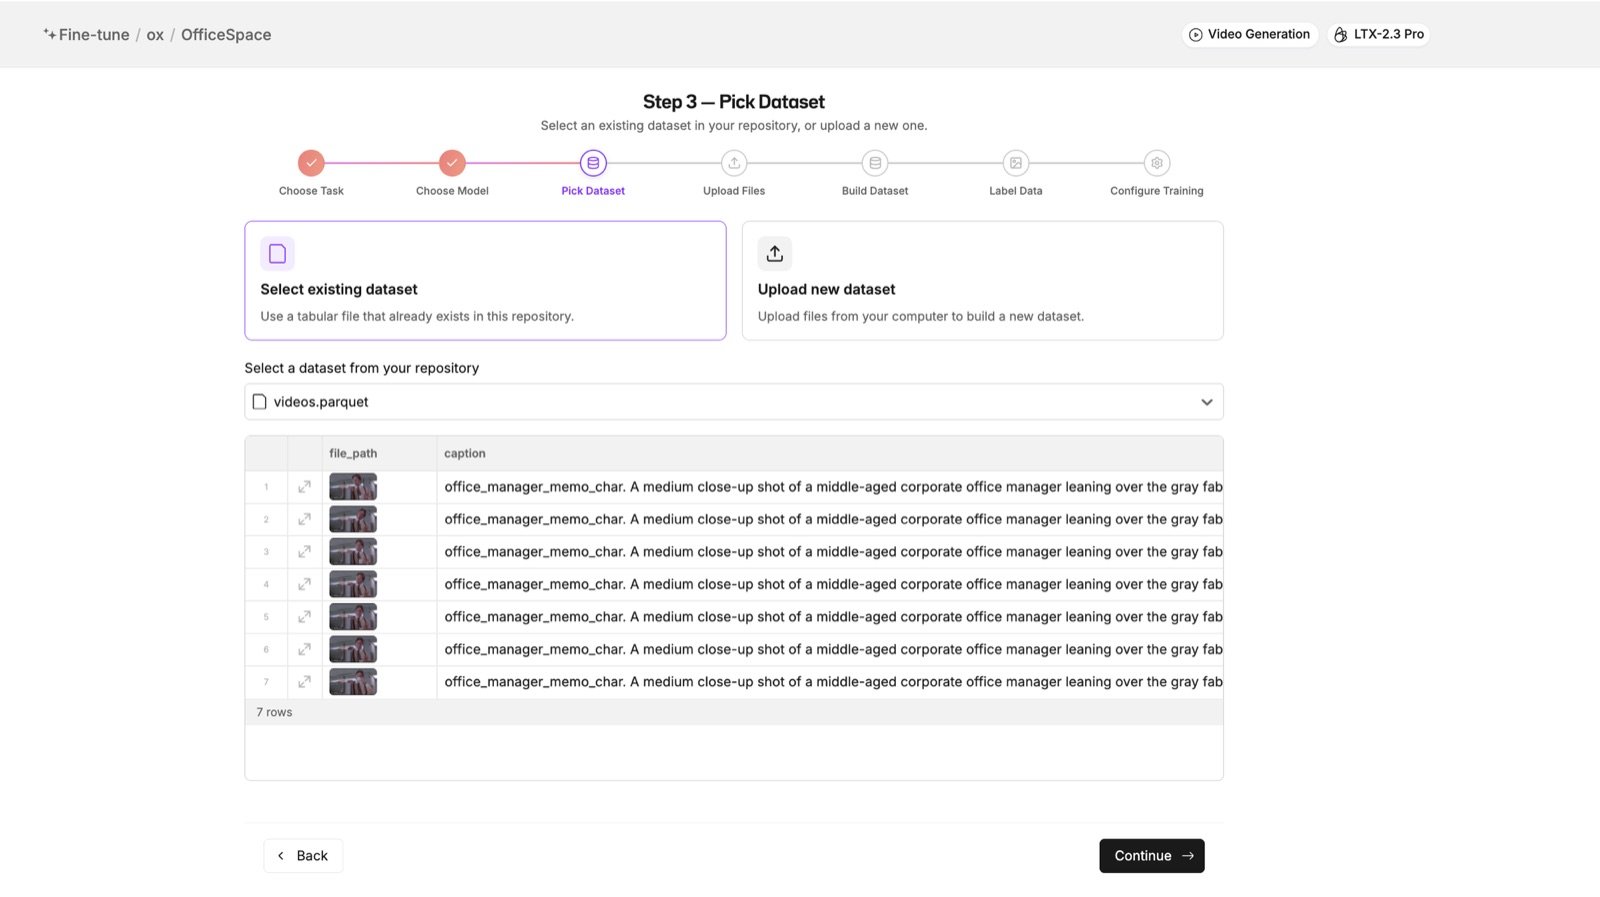
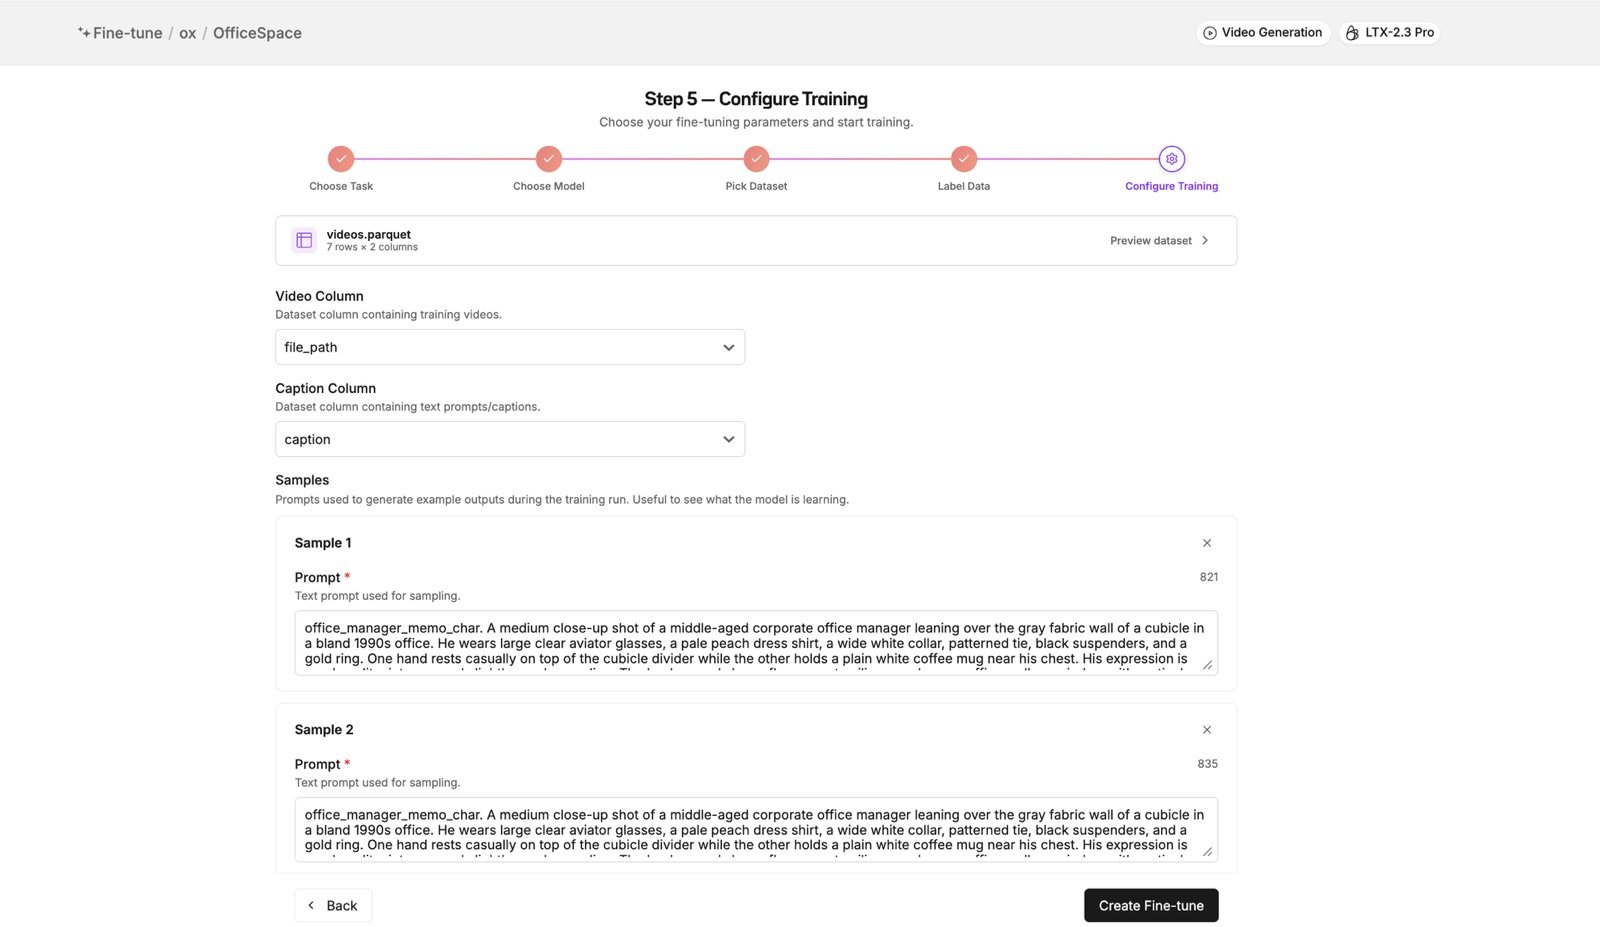
With your media labeled and happy with the quality and quantity, it is time to kick off your first fine-tune. Click "Create Fine-tune" and walk through the steps.
1. **Choose Task**, select **Generate Video**.
2. **Choose Model**, pick your base model. Here we use **LTX-2.3 Pro** ("image-to-video with native audio").
3. **Pick Dataset**, select the dataset you built (or upload a new one).
4. **Label Data**, caption the clips if you haven't already (see above).
5. **Configure Training**, set the **Video Column** to `file_path` and the **Caption Column** to `caption`, add a few sample prompts, and start the run.
Keep captions consistent with your goal. For a **character**, prefix every caption with a unique trigger token (for example `office_manager_memo_char`) so the model binds the subject to that token. For a **style**, describe the look rather than naming a character the base model already knows, so it generalizes to new subjects. If you're training on clips, add a `duration two seconds` note so the model learns when to cut to black.
If you want to further refine your prompts, you can always click the "✏️" edit button on the dataset viewer and hand label the captions. Every change is version controlled, so you can always roll back to an earlier version of the dataset.
## Kicking off the Fine-Tune
With your media labeled and happy with the quality and quantity, it is time to kick off your first fine-tune. Click "Create Fine-tune" and walk through the steps.
1. **Choose Task**, select **Generate Video**.
2. **Choose Model**, pick your base model. Here we use **LTX-2.3 Pro** ("image-to-video with native audio").
3. **Pick Dataset**, select the dataset you built (or upload a new one).
4. **Label Data**, caption the clips if you haven't already (see above).
5. **Configure Training**, set the **Video Column** to `file_path` and the **Caption Column** to `caption`, add a few sample prompts, and start the run.
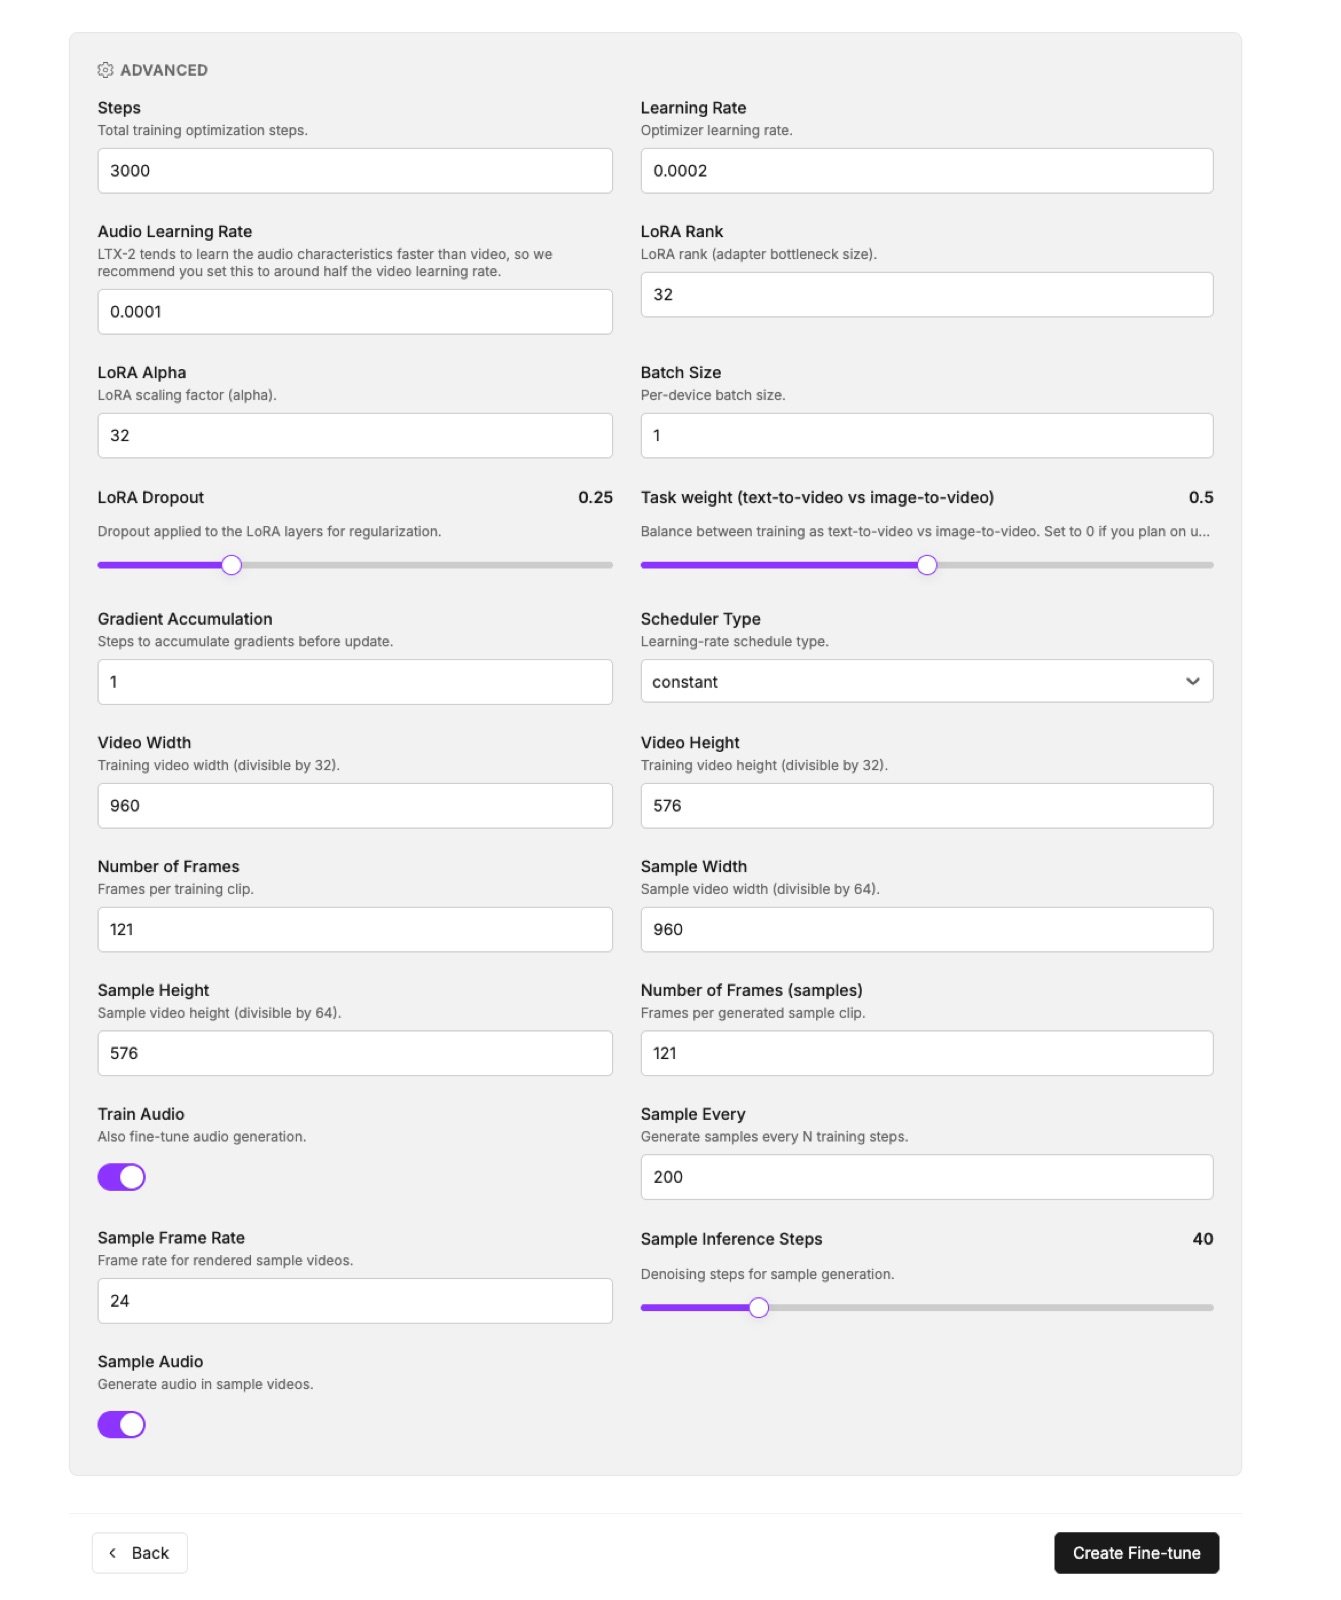
 Oxen ships good per-model defaults. You can leave them as-is, or adjust based on the size of your dataset.
| Setting | Default | Tweak for a tiny single-subject dataset |
| -------------------- | ------------- | ----------------------------------------------------------------- |
| Steps | 3000 | Stop early, watch the samples and end the run once it locks in |
| LoRA rank / alpha | 32 / 32 | Lower both to keep a small dataset from going to mush |
| LoRA dropout | 0.25 | Turn off, you're honing one subject, not regularizing for variety |
| Learning rate | 0.0002 | Keep |
| Audio learning rate | 0.0001 | Keep, roughly half the video LR since LTX learns audio faster |
| Frames / resolution | 121 @ 960×576 | Keep |
| Train / Sample audio | On | Keep on to learn the voice |
In the "Samples" section you can specify a few prompts to test as the model trains. This helps you get a feel for how the model is performing and make sure it is learning what you want. Match the caption format you trained on, including your trigger token and any `duration` note. Click "Create Fine-tune" and Oxen provisions a dedicated GPU. You can launch multiple runs in parallel to sweep hyperparameters.
Oxen ships good per-model defaults. You can leave them as-is, or adjust based on the size of your dataset.
| Setting | Default | Tweak for a tiny single-subject dataset |
| -------------------- | ------------- | ----------------------------------------------------------------- |
| Steps | 3000 | Stop early, watch the samples and end the run once it locks in |
| LoRA rank / alpha | 32 / 32 | Lower both to keep a small dataset from going to mush |
| LoRA dropout | 0.25 | Turn off, you're honing one subject, not regularizing for variety |
| Learning rate | 0.0002 | Keep |
| Audio learning rate | 0.0001 | Keep, roughly half the video LR since LTX learns audio faster |
| Frames / resolution | 121 @ 960×576 | Keep |
| Train / Sample audio | On | Keep on to learn the voice |
In the "Samples" section you can specify a few prompts to test as the model trains. This helps you get a feel for how the model is performing and make sure it is learning what you want. Match the caption format you trained on, including your trigger token and any `duration` note. Click "Create Fine-tune" and Oxen provisions a dedicated GPU. You can launch multiple runs in parallel to sweep hyperparameters.
 ## Watching the Model Learn
As your model trains, Oxen automatically samples videos from the prompts you specified in the previous step (by default every 200 steps). You can see the model start to learn the subject's face, motion, and (where supported) audio after a couple hundred steps.
*2 second video of the office manager in a cowboy hat and dark aviators says, "You're going to have to fine-tune that on Oxen.ai." An out-of-distribution prompt, the LoRA adds new details without losing the character or overfitting.*
Add an out-of-distribution sample prompt like the one above (details never in the training data). A healthy LoRA still renders those while keeping the subject, which tells you it isn't overfitting. You can download and run any checkpoint locally, or deploy it on Oxen, and stop the run as soon as the samples look good, since you only pay for the GPU time you use while fine-tuning.
## Deploying the Model
When the model has finished training, deploy it by clicking the "Deploy Model" button. Deployment takes a few minutes to complete. Some models offer more than one pipeline, for example a fast distilled pipeline for quick iteration and a higher-quality production pipeline.
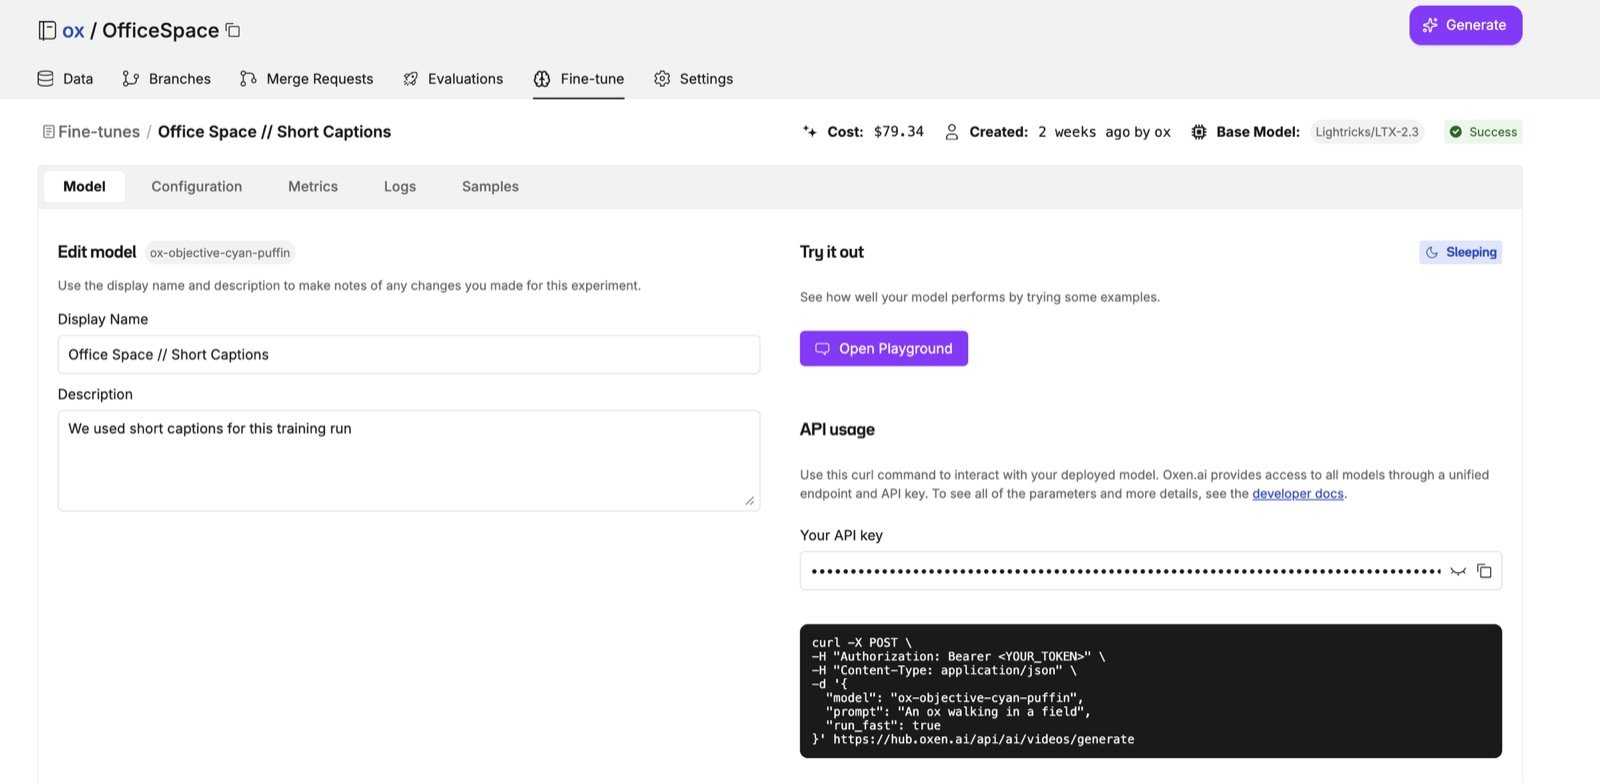
Once the model is deployed, you can use it in the playground or via the API. The model page gives you a ready-to-paste curl command with your API key filled in. Replace the `model` name with the name of your deployed model.
```bash theme={null} theme={null}
curl -X POST \
-H "Authorization: Bearer $API_KEY" \
-H "Content-Type: application/json" \
-d '{
"model": "ox-objective-cyan-puffin",
"prompt": "An ox walking in a field",
"run_fast": true
}' https://hub.oxen.ai/api/ai/videos/generate
```
## Watching the Model Learn
As your model trains, Oxen automatically samples videos from the prompts you specified in the previous step (by default every 200 steps). You can see the model start to learn the subject's face, motion, and (where supported) audio after a couple hundred steps.
*2 second video of the office manager in a cowboy hat and dark aviators says, "You're going to have to fine-tune that on Oxen.ai." An out-of-distribution prompt, the LoRA adds new details without losing the character or overfitting.*
Add an out-of-distribution sample prompt like the one above (details never in the training data). A healthy LoRA still renders those while keeping the subject, which tells you it isn't overfitting. You can download and run any checkpoint locally, or deploy it on Oxen, and stop the run as soon as the samples look good, since you only pay for the GPU time you use while fine-tuning.
## Deploying the Model
When the model has finished training, deploy it by clicking the "Deploy Model" button. Deployment takes a few minutes to complete. Some models offer more than one pipeline, for example a fast distilled pipeline for quick iteration and a higher-quality production pipeline.
Once the model is deployed, you can use it in the playground or via the API. The model page gives you a ready-to-paste curl command with your API key filled in. Replace the `model` name with the name of your deployed model.
```bash theme={null} theme={null}
curl -X POST \
-H "Authorization: Bearer $API_KEY" \
-H "Content-Type: application/json" \
-d '{
"model": "ox-objective-cyan-puffin",
"prompt": "An ox walking in a field",
"run_fast": true
}' https://hub.oxen.ai/api/ai/videos/generate
```
 ## Using the Playground
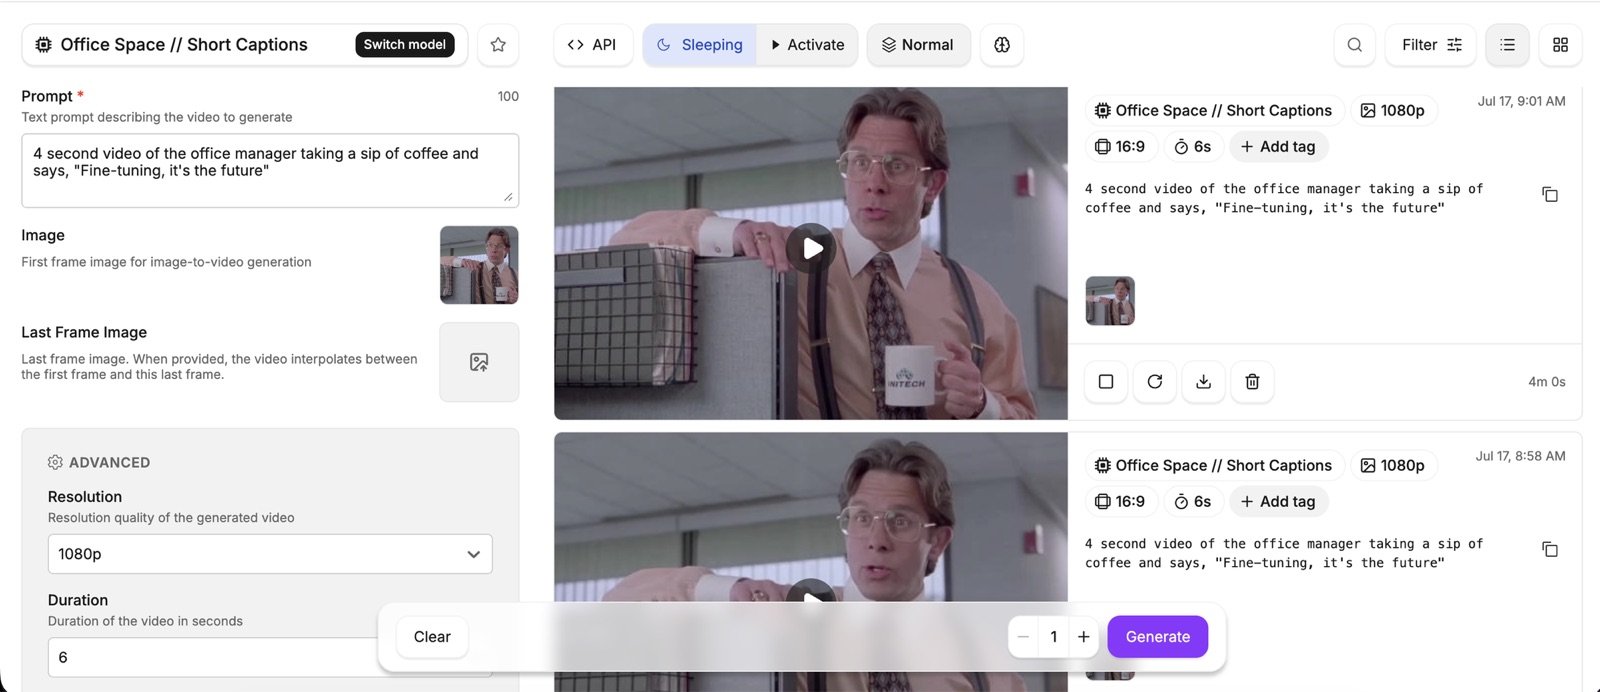
Click the "Open Playground" button to use the model in the playground. This lets you prompt the model with different images and prompts to see how it performs. If your model supports it, you can pass a **first frame** to ground the generation. Without one, the model generates from what it learned. The playground saves a history of your prompts and generations so you can refer back to them later.
## Using the Playground
Click the "Open Playground" button to use the model in the playground. This lets you prompt the model with different images and prompts to see how it performs. If your model supports it, you can pass a **first frame** to ground the generation. Without one, the model generates from what it learned. The playground saves a history of your prompts and generations so you can refer back to them later.
 ## Exporting the Model
All of the model weights are stored back in your repository when the fine-tune is complete. Navigate to the fine-tune info tab, and you will see a link to the model weights. This is helpful if you want to download the weights to run in ComfyUI or your own infrastructure. From the file viewer you can download the safetensors, or pull them automatically with the [oxen cli](/getting-started/command-line/start_repository) or [python library](/python-api).
```bash CLI theme={null} theme={null}
oxen download user-name/repo-name path/to/model.safetensors --revision COMMIT_OR_BRANCH
```
```python Python theme={null} theme={null}
from oxen import RemoteRepo
repo = RemoteRepo("user-name/repo-name")
repo.download("path/to/model.safetensors", revision="COMMIT_OR_BRANCH")
```
## Need Help Fine-Tuning?
If you need help fine-tuning your model, contact us at [hello@oxen.ai](mailto:hello@oxen.ai) and we are happy to help you get started.
## Exporting the Model
All of the model weights are stored back in your repository when the fine-tune is complete. Navigate to the fine-tune info tab, and you will see a link to the model weights. This is helpful if you want to download the weights to run in ComfyUI or your own infrastructure. From the file viewer you can download the safetensors, or pull them automatically with the [oxen cli](/getting-started/command-line/start_repository) or [python library](/python-api).
```bash CLI theme={null} theme={null}
oxen download user-name/repo-name path/to/model.safetensors --revision COMMIT_OR_BRANCH
```
```python Python theme={null} theme={null}
from oxen import RemoteRepo
repo = RemoteRepo("user-name/repo-name")
repo.download("path/to/model.safetensors", revision="COMMIT_OR_BRANCH")
```
## Need Help Fine-Tuning?
If you need help fine-tuning your model, contact us at [hello@oxen.ai](mailto:hello@oxen.ai) and we are happy to help you get started.